Monthly Archives: February 2018

Pillowcase Dress

Pillowcase Dress

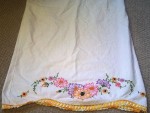
When I was living in Clarksville, MO there was this amazing little shop called The Bent Tree Gallery.  It was family owned- ‘dad’ made amazing, rustic furniture, ‘mom’ created all kinds of handicrafts and their daughter had her own shop making beautiful leather purses and other goods. Some of the many beautiful items I loved in the shop were these delicate little dresses made from vintage pillowcases.  I never bought one but kept them ‘filed’ away in my mind as something I’d love to make if I had a little girl to make them for. And voila! I not only have a lovely daughter of my own but a pretty cute niece to make all kinds of girly things for.  I’ve also been collecting vintage linens for a few years now= for no other reason than I thought they were pretty to have around.  So all of these things finally came together recently and up to my sewing room I went!

I used this pattern from Bumblebee Linens and it was surprisingly easy.  It suggested measuring your kiddo from her/his shoulder to where you want the hem to fall, but it also had a nice measuring guide if you didn’t want to measure,  or like me forgot to measure your kid and just wanted to get started(@!) The trickiest part was working with the vintage fabric. The first pillowcase I chose was pretty brittle and I had issues with it tearing. I made a second dress that came out much better. I also wasn’t quite sure how to hem the armholes so I used a combo regular and zig-zag stitch.  Here are some pics of the pillowcases I used:

I’ll be adding photos of the finished dresses soon but wanted to get this post up while I had the time. I’m thinking of adding some to my etsy site. Would you like a little pillowcase dress for a girl in your life?

Making Ramps

Making Ramps

Big and I have been having fun making ramps for his cars and trucks out of cardboard. We combined his wooden blocks with the cardboard to add some neat ramp features, like a gate at the bottom off the ramps and a jump for cars to maneuver. I decided it was time to up our game so last week we stopped by our local Ace Hardware to find some ramp building materials. The blog site “Frugal Fun for Boys and Girls” had a cool tutorial for making car ramps using existing Hot Wheels ramps and pvc pipe.  You could have different ramp at different levels. My thoughts turned into a mini science lesson on gravity and motion- the taller the ramps the faster the cars would go. We don’t have any Hot Wheels ramps, however, so the search was on for something else.

When we  got to the store,  I was able to find a small (about 5 feet long) 1/2″ piece of piping.  Big and I had fun going through the bins and finding different connectors for the pipe. Little was unimpressed.

We then went to the crafting aisle and found the perfect thing for  our ramps- balsa wood. I was happy because this meant I could use hot glue rather than hammer and nail which I’m not so good at (yet).

We bought three, 3’x4″ pieces of wood and 8 3′ long balsa sticks to use for the ramp walls.  I glued the sticks onto the wood to make little walls.  Big decided he wanted to paint the ramps and he chose black, orange and purple.  I used these paints from Discount School Supply.  After the paint dried, we set up the pvc piping and tried them out. One thing about trying some thing new, it never works out *exactly* as planned. The hot glue got a little messy and when some cars’ wheels hit the dried glue, it would slow them down. Also, the pvc pipe ramp holder wasn’t as cool as I was hoping as I didn’t buy enough pipe to make it multi-level. Again, check out this blog site for a better idea of how it could work. But I think we’ll save it and maybe try making a water wall this summer.  Big ended up going back to using his play table to support them. He had fun playing with them his own way. I’ll post more pics of how ‘s playing with the ramps soon.  What ways do you play cars and trucks with your kiddos?